LD02: Tables, and Inline CSS due Thu 07 Sep 13:20

Preparation for Lab Day
In preparation for lab day, do these actions:- In the repository workspace on your computer, create a new directory named hw02 in which you will put all of your labday #2 and homework #2 work.
- Copy all HTML and image files files from hw01 that pertain to your personal site into hw02.
- Watch this video showing some general guidelines for editing photos for the web: https://youtu.be/iLbLWsz8hos
- You should have at least three images that are part of your first homework assignment. Make a copy of each of those images. The copy should have the original file name with “-orig” appended to it. Jot down the size (in kilobytes) of each of the three images.
- Take the image files (not the copies you just made) and edit them in accordance with the video you watched. Jot down the size of the edited images and compare them to the originals to see the size difference.
- Create a new directory inside of hw02 called images and put the edited images in that directory.
- Now modify your HTML document(s) that reference the images so they will find the editied images that are now inside of the images directory. NOTE: If before the image and HTML document were in the same directory and the image file was named “house.png” then that name is all you needed. Now that house.png is inside the images directory you have to refer to it as: “images/house.png” (i.e., you have to specify the path to reach the image).
- Commit and push your work to your online repository.
On Lab Day
- Begin by showing your prep work to the instructor.
- Start by copying your widgets.html document from the hw01 directory to the hw02 directory.
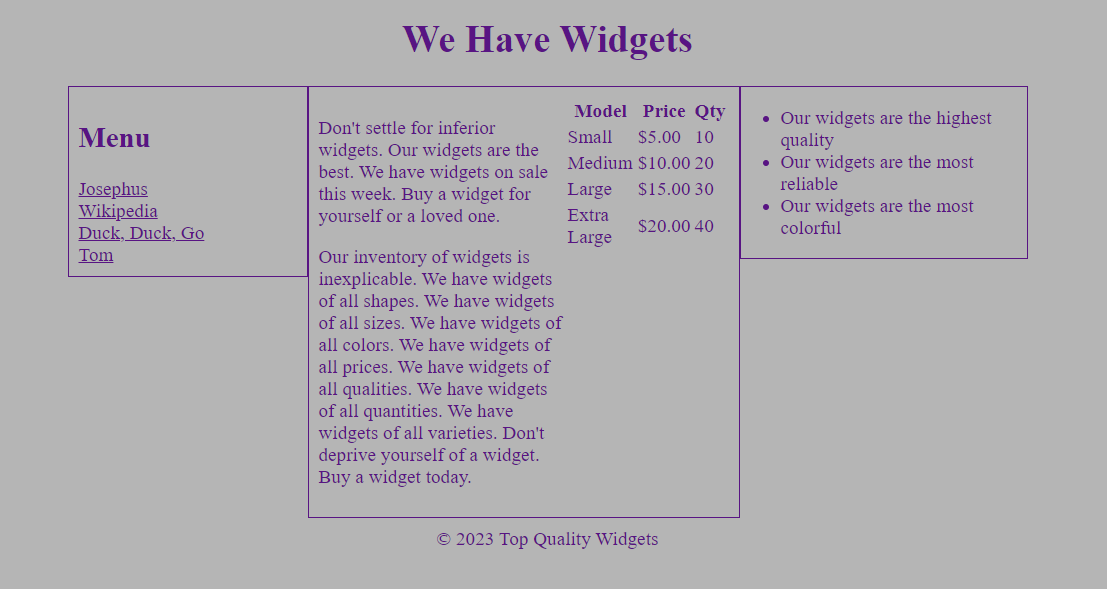
- Your goal is to create a new widgets page that has the same layout as this one: https://josephus.hsutx.edu/classes/w1/source/images/labday2_layout.png
- Add a style section in the head of your HTML document and place commands
there that cause all elements to use the border-box setting for sizing of
boxes. Also, put commands to give the page a maximum width of 960px and
to center itself when the browser is wider than that measure.
- For all remaining instructions you should should:
- Use only inline CSS.
- Continue to reference the image showing the layout we want to eventually achieve.
- Utilize the color scheme you selected for your personal page rather than the scheme used in the sample image.
- Utilize your own content regarding widgets when applicable. One exception to this is that, as pictures I'd like you to provide a table showing model, cost, and quantity of widgets you have in stock that matches the sample. Details on how to format that are given below.
- Here are some specific requirements as you move forward:
- The header and footer should each span the entire width of the screen and their text should be centered. The footer should be 10px from the nearest block above it.
- The main screen between the header and footer is divided into three side-by-side block with widths of 25%, 45%, and 30% (left to right, respectively. They each also have padding set to 10px and a 1px solid border.
- The middle portion of the main section is itself divided into
two parts. The left part should hold two paragraphs about widgets
and should be 60% of its available space. The right part will
take up the remaining space and should contain a
<table>whose content matches the example image. To learn how to format tabular data visithttp://josephus.hsutx.edu/classes/w1/source/tabledemo.html
and compare the source to the output.
- The rightmost column should contain the list you created in the previous lab day assignment. It can optionally have a header (use an h2 header for the list if you have one).
- When you've finished all steps successfully, commit your work and push
it to your cloud repository.
- Show your work to the instructor if there is time.