In this assignment you will:
- begin writing a list-making application.
- continue practice with DOM manipulations using Javascript.
The guidelines for allowed and disallowed resources are the same as given in
homework 5.
In this assignment you will begin creating a simple list-making web application.
We will continue to add features to this application as we move through the
semester. The basic idea is that a user will be able to create a list, mark
items off the list, etc.
To get started with the application, copy these source files into the hw09
directory of your work space:
Take time to look at the code provided. Notice there are two side-by-side panels.
The left panel holds a text box and an Add button and the right panel has an
empty unordered list (ul). When the Add button is clicked we want the contents of
the text box to be added to the ul as a list-item.
By the end of the assignment your list should allow adding of editable items to
the list and each item should have its own `X' button that will work as a toggle
to mark out the item if it has been completed (or unmark it if clicked again).
You will also provide buttons for deleting/marking/unmarking all items.
IMPORTANT: Remember, the goal is for you to practice/learn these concepts. Only
use the resources specifically allowed!
Here is a suggested set of steps:
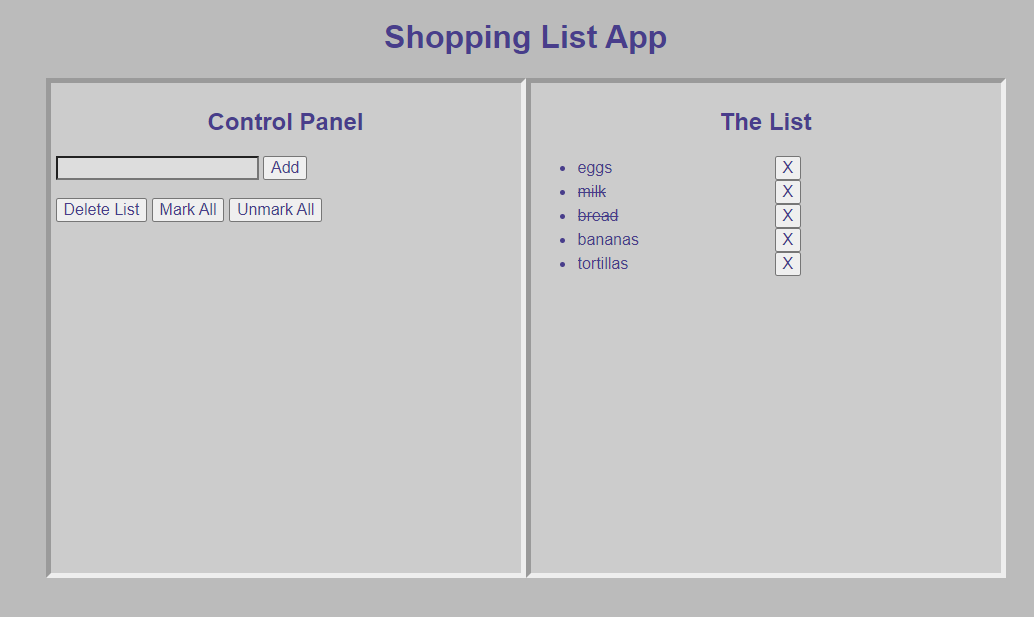
- Take a look at the image showing what this working assignment should look like:
https://josephus.hsutx.edu/classes/w1/source/hw09/hw09screen.png
- Create a new document called shoppinglist.js and link to it right after
the close body tag near the bottom of your HTML document.
- Write code so that when the Add button is clicked the contents of the text box
will be placed at the bottom of the list in the right panel.
- Modify the code so that when the element is added to the list the text box
is automatically cleared to make way for the next list item.
- Modify the code you just wrote so that the text placed in the list is embedded
in a text box so it can be edited. NOTE: The styling provided in the document
makes a text box blend in with the background so you won't see the box unless
you have clicked in it.
- Modify the code further so that in addition to putting the text box in the
list we put beside the text box a button labeled with an X.
- Add a single event handler that will react when an X button is clicked. We
want this action to apply to all the X buttons so this is a good place to
take advantage of event propagation. Initially, just write something to the
console log when a button is clicked. NOTE: Clicking in text boxes should not
cause a write to the console log.
- When an X button is clicked we want the text box to display its text
with a line through it. (HINT: Set the text box's text-decoration property
to 'line-through'). Something else that will help is that you can reach
a previous element in the DOM using the .previousElementSibling property.
In this case, the user clicks on an X button and we need to work with
the X button's previousElementSibling (i.e., the text box right in front
of it).
- Now modify the behavior of the X button so it acts as a toggle. If the
button is clicked on and the text box beside has a line through it then
remove the line (i.e., set text-decoration to none). Otherwise, put a line
through it.
- In the left panel create a button called “Delete List” that will
delete the list when clicked on.
- Add two more buttons (called “Mark All” and “Unmark All”) and write
handlers for them that will strike through all list items and unstrike
them, respectively.
Your final solution should be place in your hw09 directory in your webspace
and should be committed and pushed to bitbucket.